Samsung Dryer Heating Element Replacement in Bloomingdale (Lithia, FL)
Step-by-Step Repair Guide by Tampa Bay Appliance Fix
Note: Only do it if you are comfortable with disassembling and assembling back bulky dryer parts and connectors.
If your Samsung dryer is running but not heating, the most common causes are a failed heating element, restricted airflow, or a thermal safety device/high-limit thermostat shutting the system down.
Samsung Dryer Repair in Bloomingdale (Lithia, FL)
In Bloomingdale and Lithia homes, we frequently see dryer heating issues caused by:
- Long vent runs in newer residential construction
- Roof vent lint buildup
- Restricted or crushed ducting
- Overheating from poor airflow
In most real service calls, the heating element failure is a result of airflow restriction, not the root cause.
Power Safety
- Unplug dryer from wall
- Turn off breaker if hardwired
- Wait for full cooldown
Common Samsung Dryer Models Covered
This guide applies to most Samsung electric dryers, including:
- DV45H7000EW / DV45H6300 series
- DV42H5000EW / DV42H5200 series
- DV40J3000 series
- DV22K6800 compact models
Heating system design is similar across these models.
Search for your model on Official Samsung website
Symptoms of a Failed Heating Element
Common signs:
- Dryer runs but produces no heat
- Clothes remain damp after full cycle
- Breaker trips when heat activates
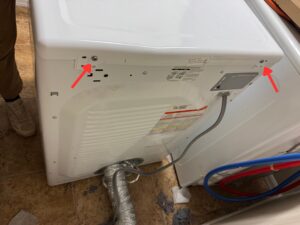
Step 1: Remove top lid
Unscrew 2 screw that holds top lid. Slide the lid towards the wall and take it off.
Step 2: Take off control panel
Unscrew 3 screws that holds control panel. Pry control panel from the bottom to take it off.
Step 3: Disconnect panel connectors
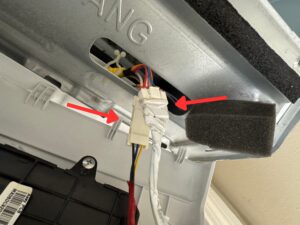
Disconnect two connectors from control panel.
Step 4: Unscrew front panel
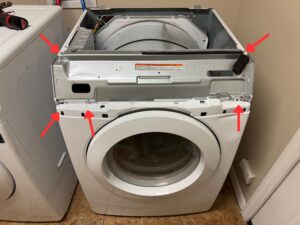
Unscrew 3 screws that holds dryer front panel. Then unscrew 2 screws that hold control panel mounting.
Step 5: Remove front panel
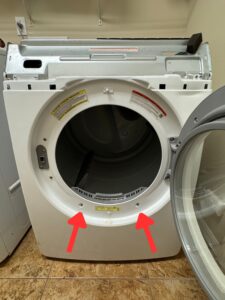
Unscrew 2 screw on the bottom that holds dryer front panel. Disconnect door lock connector. Lift the dryer panel up (HEAVY) and put it aside.
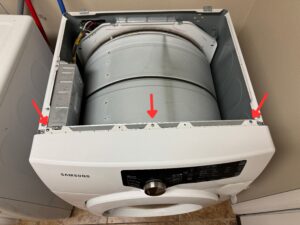
Step 6: Remove control panel mount and bulkhead
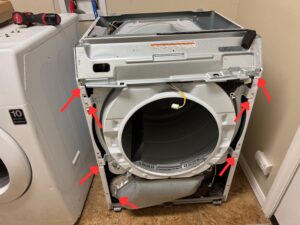
Unscrew control panel mount, lift it and put it aside. Unscrew 5 screws that hold bulkhead.
Step 7: Remove bulkhead
Carefully lift the bulkhead up (HEAVY) and put it aside.
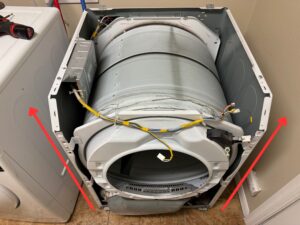
Step 8: Remove belt and drum
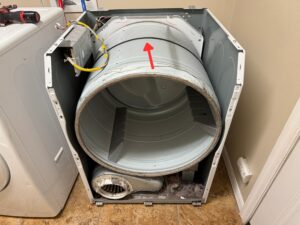

Remove dryer belt from idler pulley by pressing the pulley down. Note how it is installed or take a picture in order to put it back easily. Lift the drum up (HEAVY) by holding the belt and put drum aside.
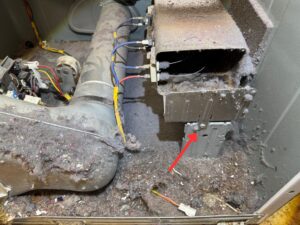
Step 9: Locate heater duct assembly
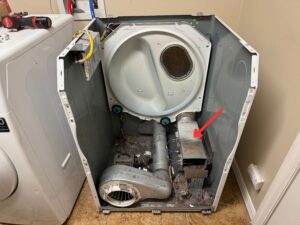
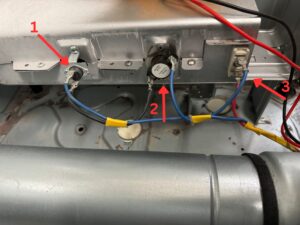
This is what you will work on. 1-Thermal Fuse (Cutoff), 2-High Limit Thermostat, 3-Heating Element.
Step 10: Test main components
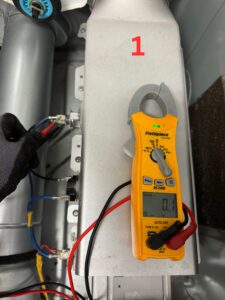

Set your digital multimeter to Continuity setting (→┤├←).
1 – Place one probe on each of the two Thermal Fuse terminal posts.
-
Pass: Meter beeps + shows Continuity
-
Fail: No beep → Replace Fuse
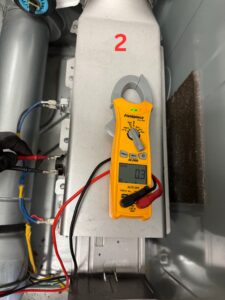
2 – Place one probe on each of the two High Limit Thermostat terminal posts.
-
Pass: Meter beeps + shows near 0 Ω
-
Fail: No beep → Replace Thermostat
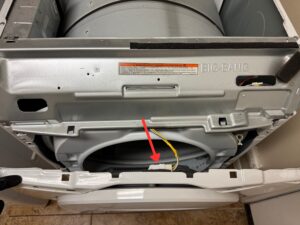
3 – Place one probe on each of the two Heating Element terminal posts.
-
Pass: Meter beeps (or shows low resistance, e.g., 9–12 Ω)
-
Fail: Meter is silent (or shows “OL” / “1”) (see fig. 3)
Step 11: Replace heating element
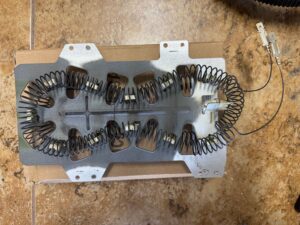
Locate one screw that hold Heating Duct Assembly, unscrew it. Unscrew 5 more screws that holds duct assy together. Replace heating element and assemble the Heater Duct Assembly.
Step 12: Reassemble dryer
Reassemble all dryer components and connect back all connectors. Test dryer on Normal Cycle.
When NOT to Replace the Heating Element
Do NOT replace the heating element if:
- Dryer heats briefly then stops
- Thermal fuse is blown
- Vent system is clogged
- Temperature sensor is faulty
- Control board is not sending power
These must be fixed first or failure will repeat.
Why Samsung Dryer Heating Elements Fail
Most common causes in Tampa Bay:
- Restricted airflow (most common)
- Long vent runs in newer homes (Lithia/Bloomingdale)
- Overheating safety shutdown cycles
- Low-quality replacement parts
- Lack of vent maintenance
Repair Cost Overview
- DIY part: $40–$120
- Professional repair: $180–$350
- Replacement dryer: $600–$1,200+
Most units under 10 years old are worth repairing.
Frequently Asked Questions
Why is my Samsung dryer running but not heating?
Usually failed heating element, thermal fuse, or airflow restriction.
How long does a heating element last?
Typically 3–7 years depending on usage, part quality and vent condition.
Why did my new heating element fail quickly?
Almost always due to clogged or restricted vent airflow.
Local Samsung Dryer Repair, Bloomingdale & Lithia, FL
If you are located in:
- Bloomingdale (Lithia, FL)
- FishHawk Ranch
- Brandon
Tampa Bay Appliance Fix provides full diagnostic and dryer repair service including heating element replacement, thermostat testing, and airflow correction.